Heating and cooling one stubborn room is a different job from putting a ductless system through a whole house, and it prices differently. A single-zone mini-split in a two-car garage, a bonus room over the garage, a converted attic or a detached ADU runs roughly $2,400 to $8,000 installed by a contractor, or roughly $1,600 to $3,900 if you buy a pre-charged DIY kit and pay an electrician for the circuit. The two numbers that decide which end of those ranges you land on are the BTU size the room actually needs and how far your electrical panel is from the wall you want the unit on. This guide works through both, plus what the DIY route legally does and does not let you do.
What One Zone Costs, Installed
These are full project costs for a single indoor head and one outdoor condenser serving one room: equipment, line set, mounting, electrical, permit and startup. They assume the condenser sits within about 25 feet of the indoor head, which covers most garage and bonus-room jobs where the outdoor unit goes on the other side of the same wall.
The pro column is what a licensed HVAC contractor quotes to supply and install the whole thing. The DIY column is a pre-charged kit you install yourself plus a licensed electrician for the circuit, a permit, and the small parts nobody includes: a condenser pad or wall bracket, line-set cover, and drain line.
The gap between the two columns is almost entirely labor. That is real money, and it is also the reason the DIY route deserves the honest treatment further down rather than a cheerful one.
| System size | Typical room | Pro, installed | DIY kit all-in |
|---|---|---|---|
| 9,000 BTU | 1-car garage, small sunroom, 150-300 sq ft | $2,400–$4,200 | $1,600–$2,700 |
| 12,000 BTU | Bonus room, converted attic, 300-500 sq ft | $2,800–$5,000 | $1,750–$3,000 |
| 18,000 BTU | 2-car garage, larger ADU, 450-750 sq ft | $3,500–$6,500 | $2,100–$3,500 |
| 24,000 BTU | 3-car or deep garage, 700-1,000 sq ft | $4,500–$8,000 | $2,400–$3,900 |
- Equipment alone, DIY-branded pre-charged kits: about $1,150–$1,600 at 9,000 BTU, $1,300–$1,700 at 12,000, $1,600–$1,850 at 18,000, and $1,800–$1,950 at 24,000 from HVAC distributors in 2026.
- Contractor labor alone for a straightforward single-zone job: $1,000–$2,500, which is usually 6 to 10 hours of a two-person crew’s time.
- Electrician for the dedicated circuit: $250–$900 depending on voltage, distance and whether the panel has room.
- Permit and inspection: $100–$300 in most jurisdictions, often covering both the mechanical and electrical permits.
Two of those line items — the electrician and the permit — exist only because a mini-split is a fixed appliance wired into the panel. If the garage is somewhere you spend afternoons in July rather than a room you live in year-round, a portable air conditioner runs off the outlet already on the wall and skips both. It will not heat the space in January and it is less efficient per unit of cooling, which is the trade.
The BTU Number: Why a Garage Is Not a Bedroom
The rule of thumb people quote is 20 BTU per square foot. That number comes from conditioned interior space with insulated walls, a conditioned floor below, and a ceiling under an insulated attic. A garage has none of those. It has an uninsulated slab that stays cold in winter and soaks up heat in summer, a large uninsulated steel door that acts like a radiator, and, in most cases, bare stud bays. We flag rules of thumb like this one when the space they were built for doesn’t match the room you’re actually pricing, which is part of how we build every range – see How We Estimate.
For an uninsulated or semi-conditioned space, 30 to 40 BTU per square foot is the realistic planning range, and a garage with a west-facing door on a hot afternoon sits at the top of it. Then add about 10 percent for every foot of average ceiling height above eight feet, because you are conditioning volume, not floor area. A converted attic with a vaulted ceiling and knee walls often needs as much capacity as a room twice its footprint.
Undersizing is the failure people actually experience: the unit runs continuously, never reaches setpoint on the worst days, and the warranty is intact while the room is still uncomfortable. Oversizing has its own cost, because an oversized system short-cycles and does a poor job of removing humidity, but modern inverter mini-splits modulate down and tolerate being a size large far better than a fixed-speed system does. If you are genuinely between two sizes in an uninsulated garage, the larger one is the safer mistake.
The table below is a starting point for quoting and shopping, not a substitute for a Manual J load calculation. Any contractor who quotes a size without asking about the garage door, the ceiling, and which direction the room faces is guessing too.
| Room | Size | Condition | BTU to plan for |
|---|---|---|---|
| 1-car garage | 200–300 sq ft | Uninsulated walls and door, slab floor | 9,000–12,000 |
| 2-car garage | 400–600 sq ft | Uninsulated walls and door, slab floor | 18,000–24,000 |
| 2-car garage | 400–600 sq ft | Insulated walls, insulated door, sealed | 12,000–18,000 |
| Bonus room over garage | 300–450 sq ft | Floor over unconditioned space, knee walls | 12,000–18,000 |
| Converted attic | 300–500 sq ft | Vaulted or sloped ceiling, retrofit insulation | 12,000–18,000 |
| Detached ADU or studio | 400–600 sq ft | Insulated to current code | 12,000–18,000 |
| Sunroom or three-season room | 150–250 sq ft | Mostly glass, minimal insulation | 9,000–12,000 |
- Insulating the garage door first is usually the cheapest BTU you will ever buy. It can move a 600 sq ft garage from a 24,000 BTU problem to an 18,000 BTU one, and it lowers the running cost forever.
- A bonus room over a garage is usually a heating problem more than a cooling one, because the floor sits above an unconditioned space. Check the heating capacity at your design temperature, not just the nameplate BTU.
- Heat pump capacity falls as it gets colder. A unit rated 18,000 BTU at 47F may deliver noticeably less at 5F, so in a cold climate read the manufacturer’s low-temperature performance table rather than the headline number.
The Electrical: The Line Item Most Quotes Get Wrong
Every mini-split condenser contains a motor-compressor, and the National Electrical Code requires a dedicated branch circuit for it. There is no version of this job where you run the unit off the garage’s existing receptacle circuit. You also need an outdoor disconnect within sight of the condenser, which is a small weatherproof box mounted on the wall next to it.
Nine and twelve thousand BTU systems are commonly available in 115V, which means a dedicated 15A or 20A circuit and, on many DIY kits, a plug-in connection. Eighteen and twenty-four thousand BTU systems are almost always 230V, which means a new double-pole breaker, heavier wire, and the disconnect. That voltage split is the single biggest reason a 12,000 BTU job and an 18,000 BTU job in the same building can differ by several hundred dollars in electrical work alone.
Price the electrical before you price the equipment, because it is where the surprises live. An electrician quoting a 30-foot run from a panel with two open spaces is a different conversation from one quoting a detached garage with no feeder at all.
- 115V dedicated circuit, panel in the same building with space available: $250–$600
- 230V dedicated circuit plus outdoor disconnect, short run: $400–$900
- Panel is full and needs a subpanel or a service rework: add $400–$1,500
- Detached garage or ADU with no existing feeder, including a trench: $1,200–$4,000 and up, which frequently costs more than the mini-split itself
- Full service upgrade from 100A to 200A if the panel cannot carry the load: $1,800–$4,000
- Permit and inspection for the electrical work: $100–$300, bundled with the mechanical permit in many jurisdictions
The DIY Kit Route, Told Straight
Pre-charged DIY mini-splits are a genuine category, not a gimmick. The manufacturer ships the system with the refrigerant sealed inside and a line set with quick-connect fittings, so there is no flaring, no vacuum pump and no gauge set in the normal install. The mechanical work is real but ordinary: mount a bracket, core a three-inch hole through the wall, hang the head, set the condenser on a pad or wall bracket, connect the lines, connect the drain, and turn it on. Most people finish in a weekend.
Warranty terms on the DIY lines are the part that is genuinely unusual. MRCOOL’s DIY 5th Generation warranty covers 5 years on parts and 7 years on the compressor and does not require professional installation to stay valid, as long as the system is installed to the instructions and to applicable law. That is not how most HVAC brands work. The same manufacturer’s non-DIY, tech-install line is explicitly not intended for self-installation, and installing one of those yourself can void the warranty, so confirm which product line you are buying before you assume the DIY terms apply.
The refrigerant rules are where the marketing and the regulation do not line up, and this is worth getting right. EPA’s own published question and answer on Section 608 asks whether technician certification is required to install an R-410A mini-split, and answers: "Yes. Adding or removing refrigerant from a mini-split as part of installation, and/or connecting or disconnecting hoses or pre-charged lines requires a section 608 technician certification." EPA’s certification materials list attaching and detaching hoses, adding or removing refrigerant, and cutting a refrigerant line among the activities that require certification, and publish no homeowner exemption for stationary equipment.
So the honest position is this. Buying a sealed, pre-charged system is lawful, because the sales restriction on refrigerant applies to loose refrigerant rather than to a complete factory-charged appliance, which is exactly why these kits are sold to the public at all. Venting refrigerant is prohibited outright. But EPA’s written answer does not carve out homeowners making those pre-charged connections, so treat any listing that says "no EPA certification required" as a marketing claim rather than a legal finding, and check your state and local rules, which in some places are stricter than the federal ones.
Note also that systems sold in 2026 ship with R-454B rather than R-410A, including the DIY lines and their matching line sets. Line sets and parts are not interchangeable between the two, so do not buy a spare line set or an extension based on an older part number, and do not plan on topping up an A2L system with anything you have left over from an R-410A job.
- What the kit includes: indoor head, outdoor condenser, and a pre-charged line set, typically 11.5 to 16 feet on the standard kits and 25 feet on the extended ones.
- What it does not include: the electrical circuit, the disconnect, the permit, the condenser pad or wall bracket, line-set cover, and usually the condensate drain line.
- What still needs a licensed trade: the dedicated circuit and disconnect. Many jurisdictions let a homeowner pull an electrical permit for an owner-occupied dwelling, but not all, and a detached garage or ADU is not always treated the same as the house. Ask the building department before you buy anything.
- Condensate: the indoor head produces water whenever it is cooling. A gravity drain sloped at least a quarter inch per foot to the outside is the simple answer. If the head is below the drain point or on an interior wall with nowhere to run, you need a small condensate pump, which is $60–$150 for the part or $150–$350 installed.
- Realistic time: 6 to 12 hours for a first-timer on a straightforward wood-framed wall, spread over a weekend, plus whatever the electrician and the inspection take.
What Actually Drives the Spread
Two identical 18,000 BTU garage jobs can quote $3,500 and $6,500. The equipment is not what separates them. These are, roughly in order of how often they matter.
- Line-set length. Anything beyond what the kit or the standard allowance covers runs about $18–$28 per foot installed, and a long run also means more refrigerant charge and more labor routing it.
- Wall construction. Coring a three-inch hole through wood framing and siding is minutes of work. Through brick, block or poured concrete it needs a rotary hammer and a core bit, and adds roughly $150–$400 to a pro quote.
- Panel capacity and distance. Covered above, and it is the single largest swing factor on a detached building.
- Condenser placement. On a slab or pad at grade is cheapest. A wall bracket, a roof curb, or a raised stand for snow country all add hardware and labor.
- Condensate routing. A gravity drain to the outside is free. A pump, a long drain run, or tying into an existing plumbing drain is not.
- Regional labor. HVAC labor runs roughly $75–$150 per hour, and coastal metros sit at the top of that while much of the rural Midwest and South sits at the bottom. The same job can differ 40 percent between two zip codes.
- Removal of whatever is there now. Pulling out a window unit is nothing. Removing an old through-wall unit and patching the opening is a half day.
Tax Credits and Rebates in 2026: Check Before You Count On It
This is the section most cost guides get wrong, so here is what the primary sources say as of September 2026.
The federal 25C Energy Efficient Home Improvement Credit, which used to return up to $2,000 on a qualifying heat pump, is over. The IRS page for the credit states that it is "allowed for qualifying property placed in service on or after Jan. 1, 2023, and before December 31, 2025," and that page was last reviewed in April 2026. If your system goes in during 2026, there is no 25C credit for it. Any page telling you the credit runs through 2032 is describing a version of the law that no longer applies, and there are a lot of those pages.
State-administered rebates are a different story and may still be worth real money, but they vary by state and they are income-qualified. The Department of Energy’s own Home Energy Rebates page says the programs are "now available in select states" and directs you to your State or Territory Energy Office for current availability and eligibility, without publishing a live state-by-state list. Headline figures are up to $8,000 under the efficiency track and up to $14,000 total under the electrification track, with the largest awards going to households below 80 percent of area median income.
Two practical cautions. First, verify at your state energy office, not at an SEO page quoting a state list, because the launch dates have moved repeatedly. Second, these programs are generally aimed at dwelling units, so confirm directly with the program whether an attached garage, a detached shop or an ADU counts before you build the rebate into your budget. Utility rebates are a separate and often easier path, and many electric utilities pay a few hundred dollars for a qualifying ductless heat pump regardless of income, so check your own utility’s rebate page too.
If You’re Taking the DIY Route
A pre-charged kit covers the system and the line set, but these are the parts that are not in the box and that people end up buying mid-install.
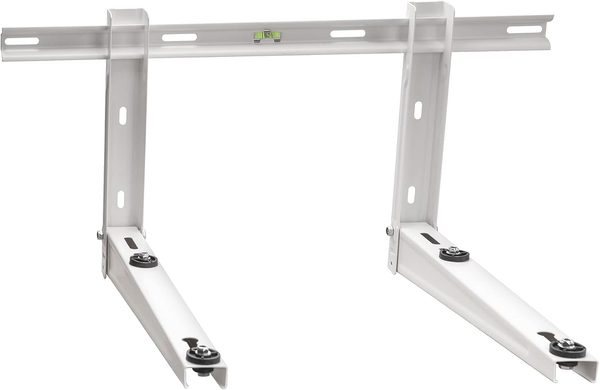
- ICOOL Mini Split Wall Mounting Bracket — Holds the outdoor condenser off the wall where there is no room for a ground pad, which is common on a zero-lot-line garage. Check the bracket’s rated load against your condenser’s weight, not just its BTU range.
- Line set cover kit — Encloses the refrigerant lines, drain and whip on the outside wall. It is cosmetic on day one and protective for the next fifteen years, since UV and string trimmers are what kill exposed insulation.
- Condensate pump — Needed when the indoor head sits below the drain point or on an interior wall. Buy the one with a float safety switch that cuts the system off if the pump fails, rather than letting it overflow behind the drywall.
- Condenser ground pad — Keeps the outdoor unit off the dirt and level. In snow country, plan on a raised stand instead so the coil is above the drift line and the defrost water has somewhere to go.
- Garage door insulation kit — Do this before you size the system, not after. An uninsulated steel door is the single biggest load in most garages, and cutting that load can move you down a whole BTU size.
Stop and call a pro if the panel is full, if the building has no feeder of its own, if your jurisdiction will not issue an electrical permit to a homeowner, if the wall is masonry, or at any point where a refrigerant line has to be cut, flared, evacuated or reconnected after being opened. That last one is where a weekend project becomes a service call and a lost warranty.
The decision is simpler than the price ranges make it look. If the room is small enough for a 115V system, the panel is in the same building with space in it, and the wall is ordinary wood framing, the DIY route saves $1,500 to $3,000 and the work is within reach of a competent homeowner with a weekend and a helper. If the room needs 18,000 BTU or more, or the building has no power of its own, or the wall is masonry, the electrical and structural work dominates the quote and the labor savings shrink to a point where a contractor’s warranty and a single phone number for callbacks are worth what they cost. Either way, settle the BTU number and get an electrician’s quote on the circuit before you shop the equipment, because those two figures decide everything else on the estimate.
Leave a Reply